i.CoreM6 1.5
This tutorial will show the details of Engicam i.CoreM6 1.5 SOM Mainline software support and other needed details.
This SOM is compatible with EDIMM STARTER KIT i.Core 1.5 MIPI Evaluation board Support Boot from SD/MMC card and eMMC.
BSP Build
Manual Build
Image building need host to ready with all necessary tools ready, refer here for Host and Crosstool
U-Boot
$ git clone git://git.denx.de/u-boot.git
$ cd u-boot
$ make imx6qdl_icore_mipi_defconfig && make
Linux
$ git clone git://git.kernel.org/pub/scm/linux/kernel/git/next/linux-next.git
$ cd linux-next
$ make mrproper
$ ARCH=arm make imx_v6_v7_defconfig
$ ARCH=arm make LOADADDR=0x10008000 uImage dtbs
Buildroot
$ git clone https://github.com/amarula/buildroot-amarula
$ cd buildroot-amarula
$ git checkout -b imx6-media origin/imx6-media
$ make engicam_imx6qdl_icore_qt5_gst1_media_defconfig && make
Boot
Write SD
For manual build images will write by partitioning SD card
$ cd /path/to/u-boot
$ dd if=SPL of=/dev/mmcblk0 bs=1k seek=1
$ dd if=u-boot-dtb.img of=/dev/mmcblk0 bs=1k seek=69
$ cd /path/to/linux-next
$ cp arch/arm/boot/uImage /media/jagan/rootfs
$ cp arch/arm/boot/dts/imx6q-icore-mipi.dtb /media/jagan/rootfs
$ cp arm_ramdisk.image.gz /media/jagan/rootfs
$ sync && umount /dev/mmcblk0p1
For buildroot, we can write single image sdcard.img directly
$ cd /path/to/buildroot
$ dd if=output/images/sdcard.img of=/dev/mmcblk0
$ sync
Boot SD
Insert the SD card in the SD slot of the board;
Connect 3-wire RS232 serial port J28 on board, and connect with other
Serial end or USB cable(if serial-to-usb converter used) using a terminal emulator at 115200 bps, 8n1;
Close JM3 for sd boot.
Power on the board.
Boot eMMC
Boot from SD and write images on eMMC in Linux prompt
Open JM3 for eMMC boot
USB SDP
More info at, u-boot/doc/README.sdp
Clone imx_usb_loader
$ git clone git://github.com/boundarydevices/imx_usb_loader.git
$ cd imx_usb_loader
$ make
Build the BSP and copy SPL, u-boot-dtb.img in imx_usb_loader directory
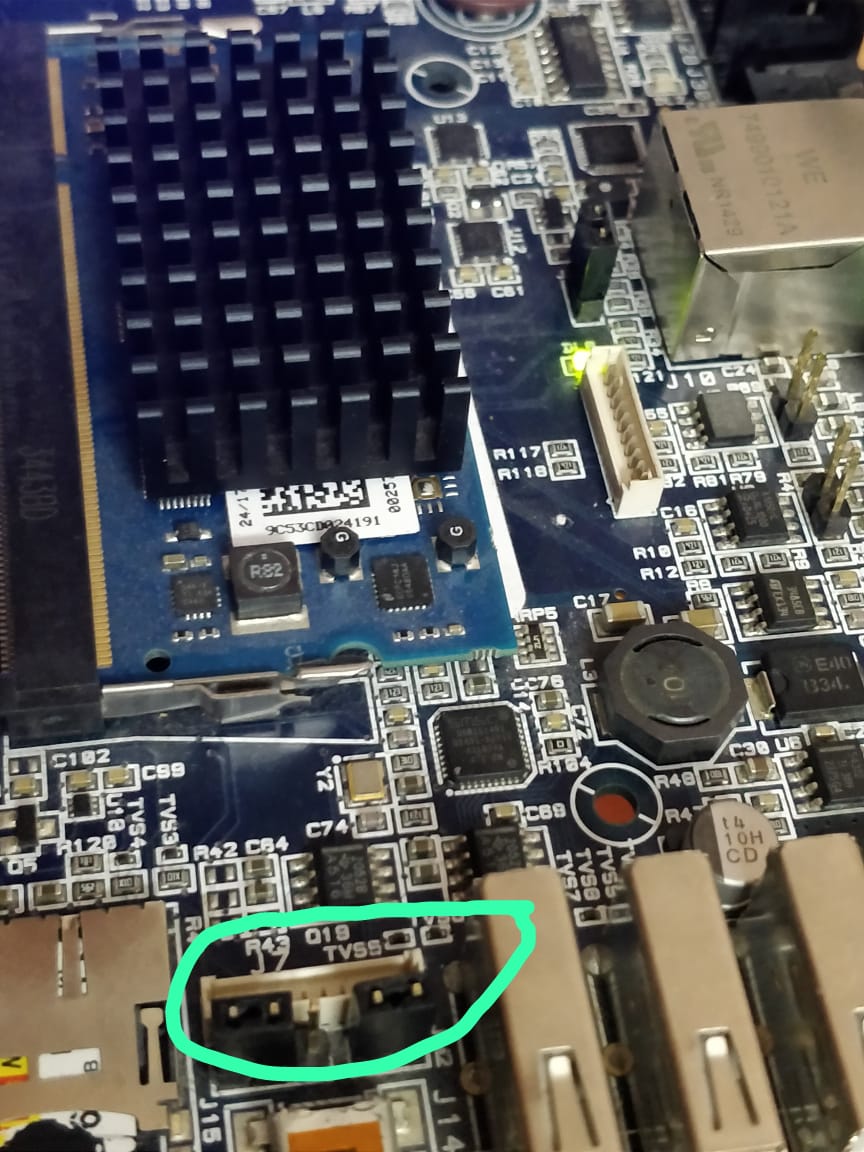
Put the board in “Serial Download Mode” ( Using jumpers circled in below image)
Plug-in USB-to-Serial and USB OTG cables to Host and Turn-on board
Identify VID/PID using lsusb
Bus 001 Device 010: ID 15a2:0061 Freescale Semiconductor, Inc. i.MX 6Solo/6DualLite SystemOnChip in RecoveryMode
Update the conf files
imx_usb.conf
0x15a2:0x0054, mx6_usb_rom.conf, 0x0525:0xb4a4, mx6_usb_sdp_spl.conf
mx6_usb_rom.conf
mx6_usb
hid,1024,0x910000,0x10000000,512M,0x00900000,0x40000
SPL:jump header
mx6_usb_sdp_spl.conf
mx6_spl_sdp
hid,uboot_header,1024,0x910000,0x10000000,512M,0x00900000,0x40000
u-boot-dtb.img:jump header
Launch the loader
./imx_usb
Identify board booting on serial
MIPI-CSI2 OV5640 Camera
Build
Since Mainline Linux has some regression issue with 0v5640 So build linux-next till working commit.
$ git clone https://github.com/amarula/linux-amarula
$ cd linux-amarula
$ git checkout -b imx6-ov5640 origin/imx6-ov5640
$ ARCH=arm make imx_v6_v7_defconfig
$ ARCH=arm make LOADADDR=0x10008000 uImage dtbs -j 16
Use rootfs.ext4 from buildroot built
Capture
Once Linux boot, prepare media control chart for finding pipeline setups
On target
# media-ctl --print-dot > mipi-ov5640.dot

On host
$ dot -T png -o mipi-ov5640.png mipi-ov5640.dot
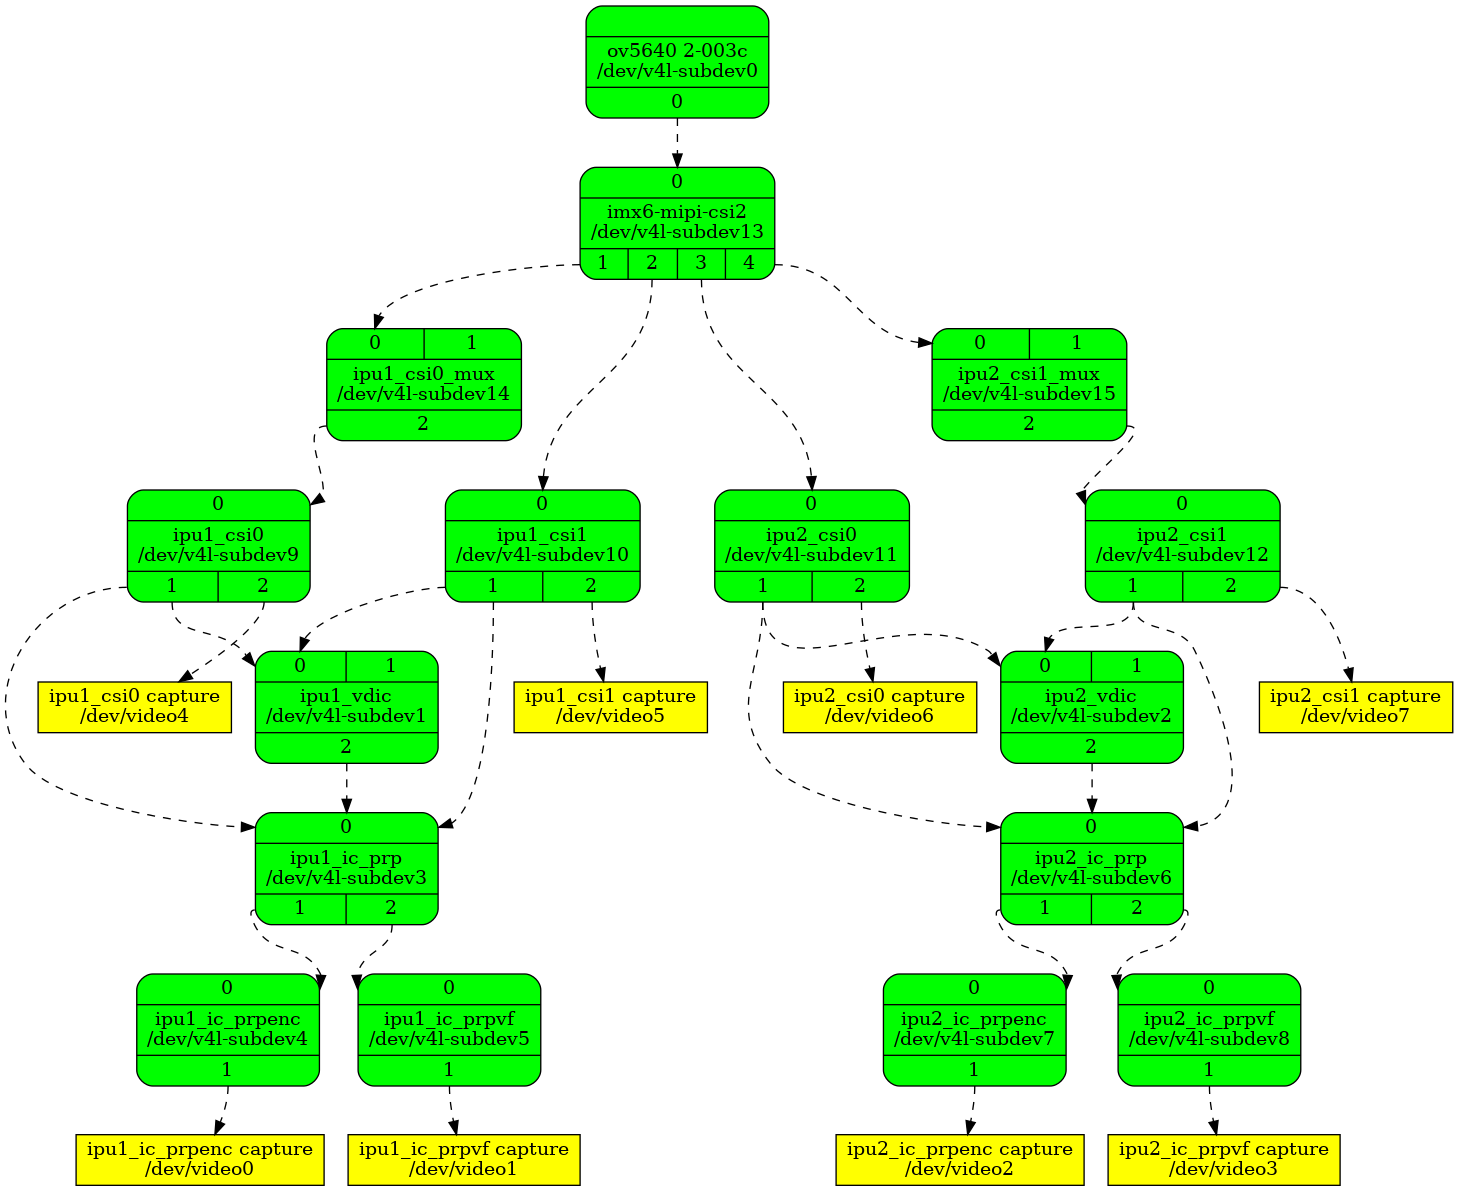
configure the pipeline with default format AYUV32/640x480,this can be alter with any other relevant format to testing with.
/* setup MC links */

# media-ctl --links "'ov5640 2-003c':0->'imx6-mipi-csi2':0[1]"
# media-ctl --links "'imx6-mipi-csi2':1->'ipu1_csi0_mux':0[1]"
# media-ctl --links "'ipu1_csi0_mux':2->'ipu1_csi0':0[1]"
# media-ctl --links "'ipu1_csi0':2->'ipu1_csi0 capture':0[1]"

/* configure pads */

# media-ctl --set-v4l2 "'ov5640 2-003c':0[fmt:UYVY2X8/640x480 field:none]"
# media-ctl --set-v4l2 "'imx6-mipi-csi2':1[fmt:UYVY2X8/640x480 field:none]"
# media-ctl --set-v4l2 "'ipu1_csi0_mux':2[fmt:UYVY2X8/640x480 field:none]"
# media-ctl --set-v4l2 "'ipu1_csi0':2[fmt:AYUV32/640x480 field:none]"
Launch the camera with ipu1_csi0 capture

# gst-launch-1.0 -v v4l2src device=/dev/video4 ! autovideosink