i.MX6 HABv4
About this
This tutorial describe the information and usage about i.MX Secure Architecture.
i.MX Security
Verify the loaded software to ensure that it is authorized during runtime is usually termed as Verified or Secure or Trusted system mechanism.
i.MX Trust Architecture - Overview
Below are the threats that are identified and processed with trusted architecture.
Malware:
Rootkits, trojans, viruses, worms, keyloggers, bots
Risk enhanced by rich & open OS
Countermeasures: trusted execution, high assurance boot
Hacking
Reverse engineering, brute force
Countermeasures: secure storage, secure debug, encryption
Physical attack
Bus snooping, glitching,
Countermeasures: secure storage, tamper detection
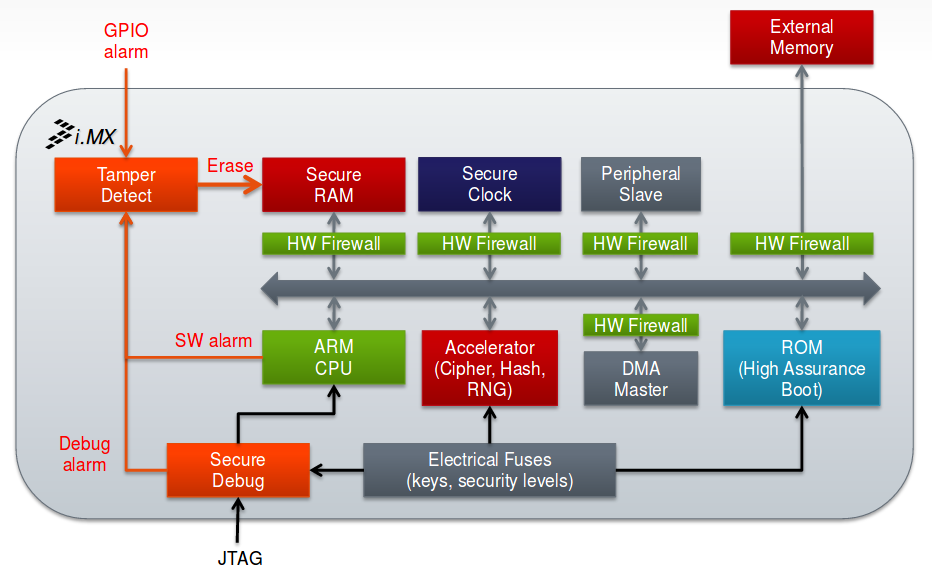
i.MX Trust Architecture - Features
Trusted Execution:
TrustZone Secure & Normal Worlds (processor modes)
Isolates execution of critical SW from possible malware
Hardware firewalls between CPU & DMA masters and memory & peripherals
High Assurance Boot:
Authenticate/Signed boot: prevent unauthorized software execution
Encrypted boot: protects software confidentiality
Signature checks embedded in on-chip boot ROM
Run every time processor reset
Cryptographic Accelerators:
i.MX family dependent
Symmetric: AES-128, AES-256, 3DES, ARC4
Message Digest & HMAC: SHA-1, SHA-256, MD-5
Secure Storage:
Protects data confidentiality and integrity
HW-only keys: no SW access
Off-chip: cryptographic protection including device binding
On-chip: self-clearing Secure RAM (CAAM)
HW Random Number Generation:
Ensures strong keys and protects against protocol replay
On-chip entropy generation
Cryptographically secure deterministic RNG (NIST compliant)
SNVS Secure Clock:
Provides reliable time source
On-chip, separately-powered real-time clock
Protection from SW tampering
Secure Debug:
Three security levels + complete JTAG disable
Protects against HW debug (JTAG) exploitation for Security circumvention and Reverse engineering
Tamper Detection:
Protects against run-time tampering
Monitoring of various alarm sources
Debug activation
External alarm (e.g. cover seal)
SW integrity checks
SW alarm flags
High Assurance Boot (HAB)
Below are the recommend acronyms related to this tutorial.
Boot ROM: Small piece of one-time programmable firmware written in on-chip read-only memory location and the very first unsigned-software which is executed by the processor on power-on or reset.
Secure Boot ROM: Similar to Boot ROM, but capable of running signed-software using secure libraries.
HAB Library: Secure software library executed in i.MX Boot ROM, using Signing and Encryption processes.
Signed Software/Image: Software Image further padded or processed using Signature that can capable to run only on secure environment.
Signature: Legally binding secure attributes to Signed Image, these attributes can be Private/Public keys, HAB data, Certificate, Secrete keys etc which is understandable by the HAB.
CSF: Command Sequence File, a binary data structure interpreted by the HAB to guide signing and/or decryption process.
CST: Code Signing Tool, like OpenSSL an application running on a build host to generate PKI tree, SRK table along with associated CSF file.
PKI tree: Public Key Infrastructure, a hierarchy of public key certificates in which each certificate (except the root certificate) can be verified using the public key above it.
RSA: Public key cryptography algorithm used for Signing or Authentication process.
SRK: Super Root Key, an RSA key pair which forms the start of the boot time authentication chain. The hash of the SRK public key is embedded in the processor using OTP hardware(e-fuse). The SRK private key is held by the Signature generation for software image.
DEK: Data Encryption Key (DEK), is the key that will be used to actually encrypt the image.
DEK Blob: Encryption of DEK using OTPMK with the help of CAAM HW
OTPMK: AES-256 key burned to fuses by NXP before the IC is shipped. This is unique per chip and only CAAM can access the key.
Secret Key: Generally an outcome key of DEK Blob key used to encrypt and decrypt.
AES: Advanced Encryption Standard used for Encryption process
HAB Secure Boot chain
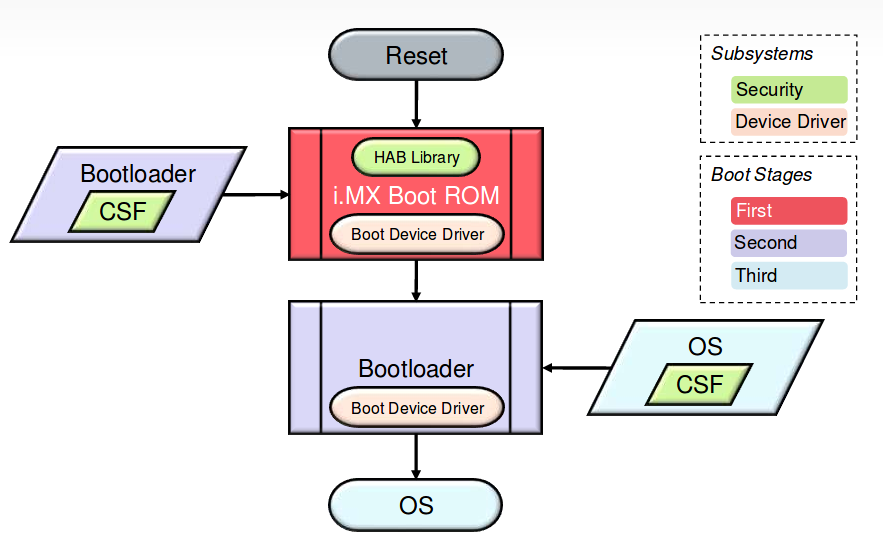
Upon reset i.MX Boot ROM reads the efuse to determine the security configuration of the SoC and the type of the boot device.
The ROM then loads the bootloader image(signed-image) to DDR memory. The image contains both the bootloader itself and signature data and public key certificate data which are collectively called CSF data.
Once the bootloader is loaded, execution is then passed to the HAB library which will verify the signatures of the bootloader stage.
If signature verification fails, execution is not allowed to leave the ROM for securely configured SoCs, also called “closed” devices
If signature verification pass, execution is allowed to leave the ROM for securely configured SoCs, also called “open” devices
HAB Overview
HAB support Signing and Encryption process, where later one change the software-data into unreadable random gibberish using secrete key.
HABv4 is the version supported by i.MX6
HAB interfaces with SNVS and CAAM secure boot components.
CAAM accelerate SHA-256 operation during signature verification and AES-128 operation during decryption boot operation.
HAB support X.509 Public key certificate, in CMS signature format.
HAB - Signed Boot
Signed Boot Flow
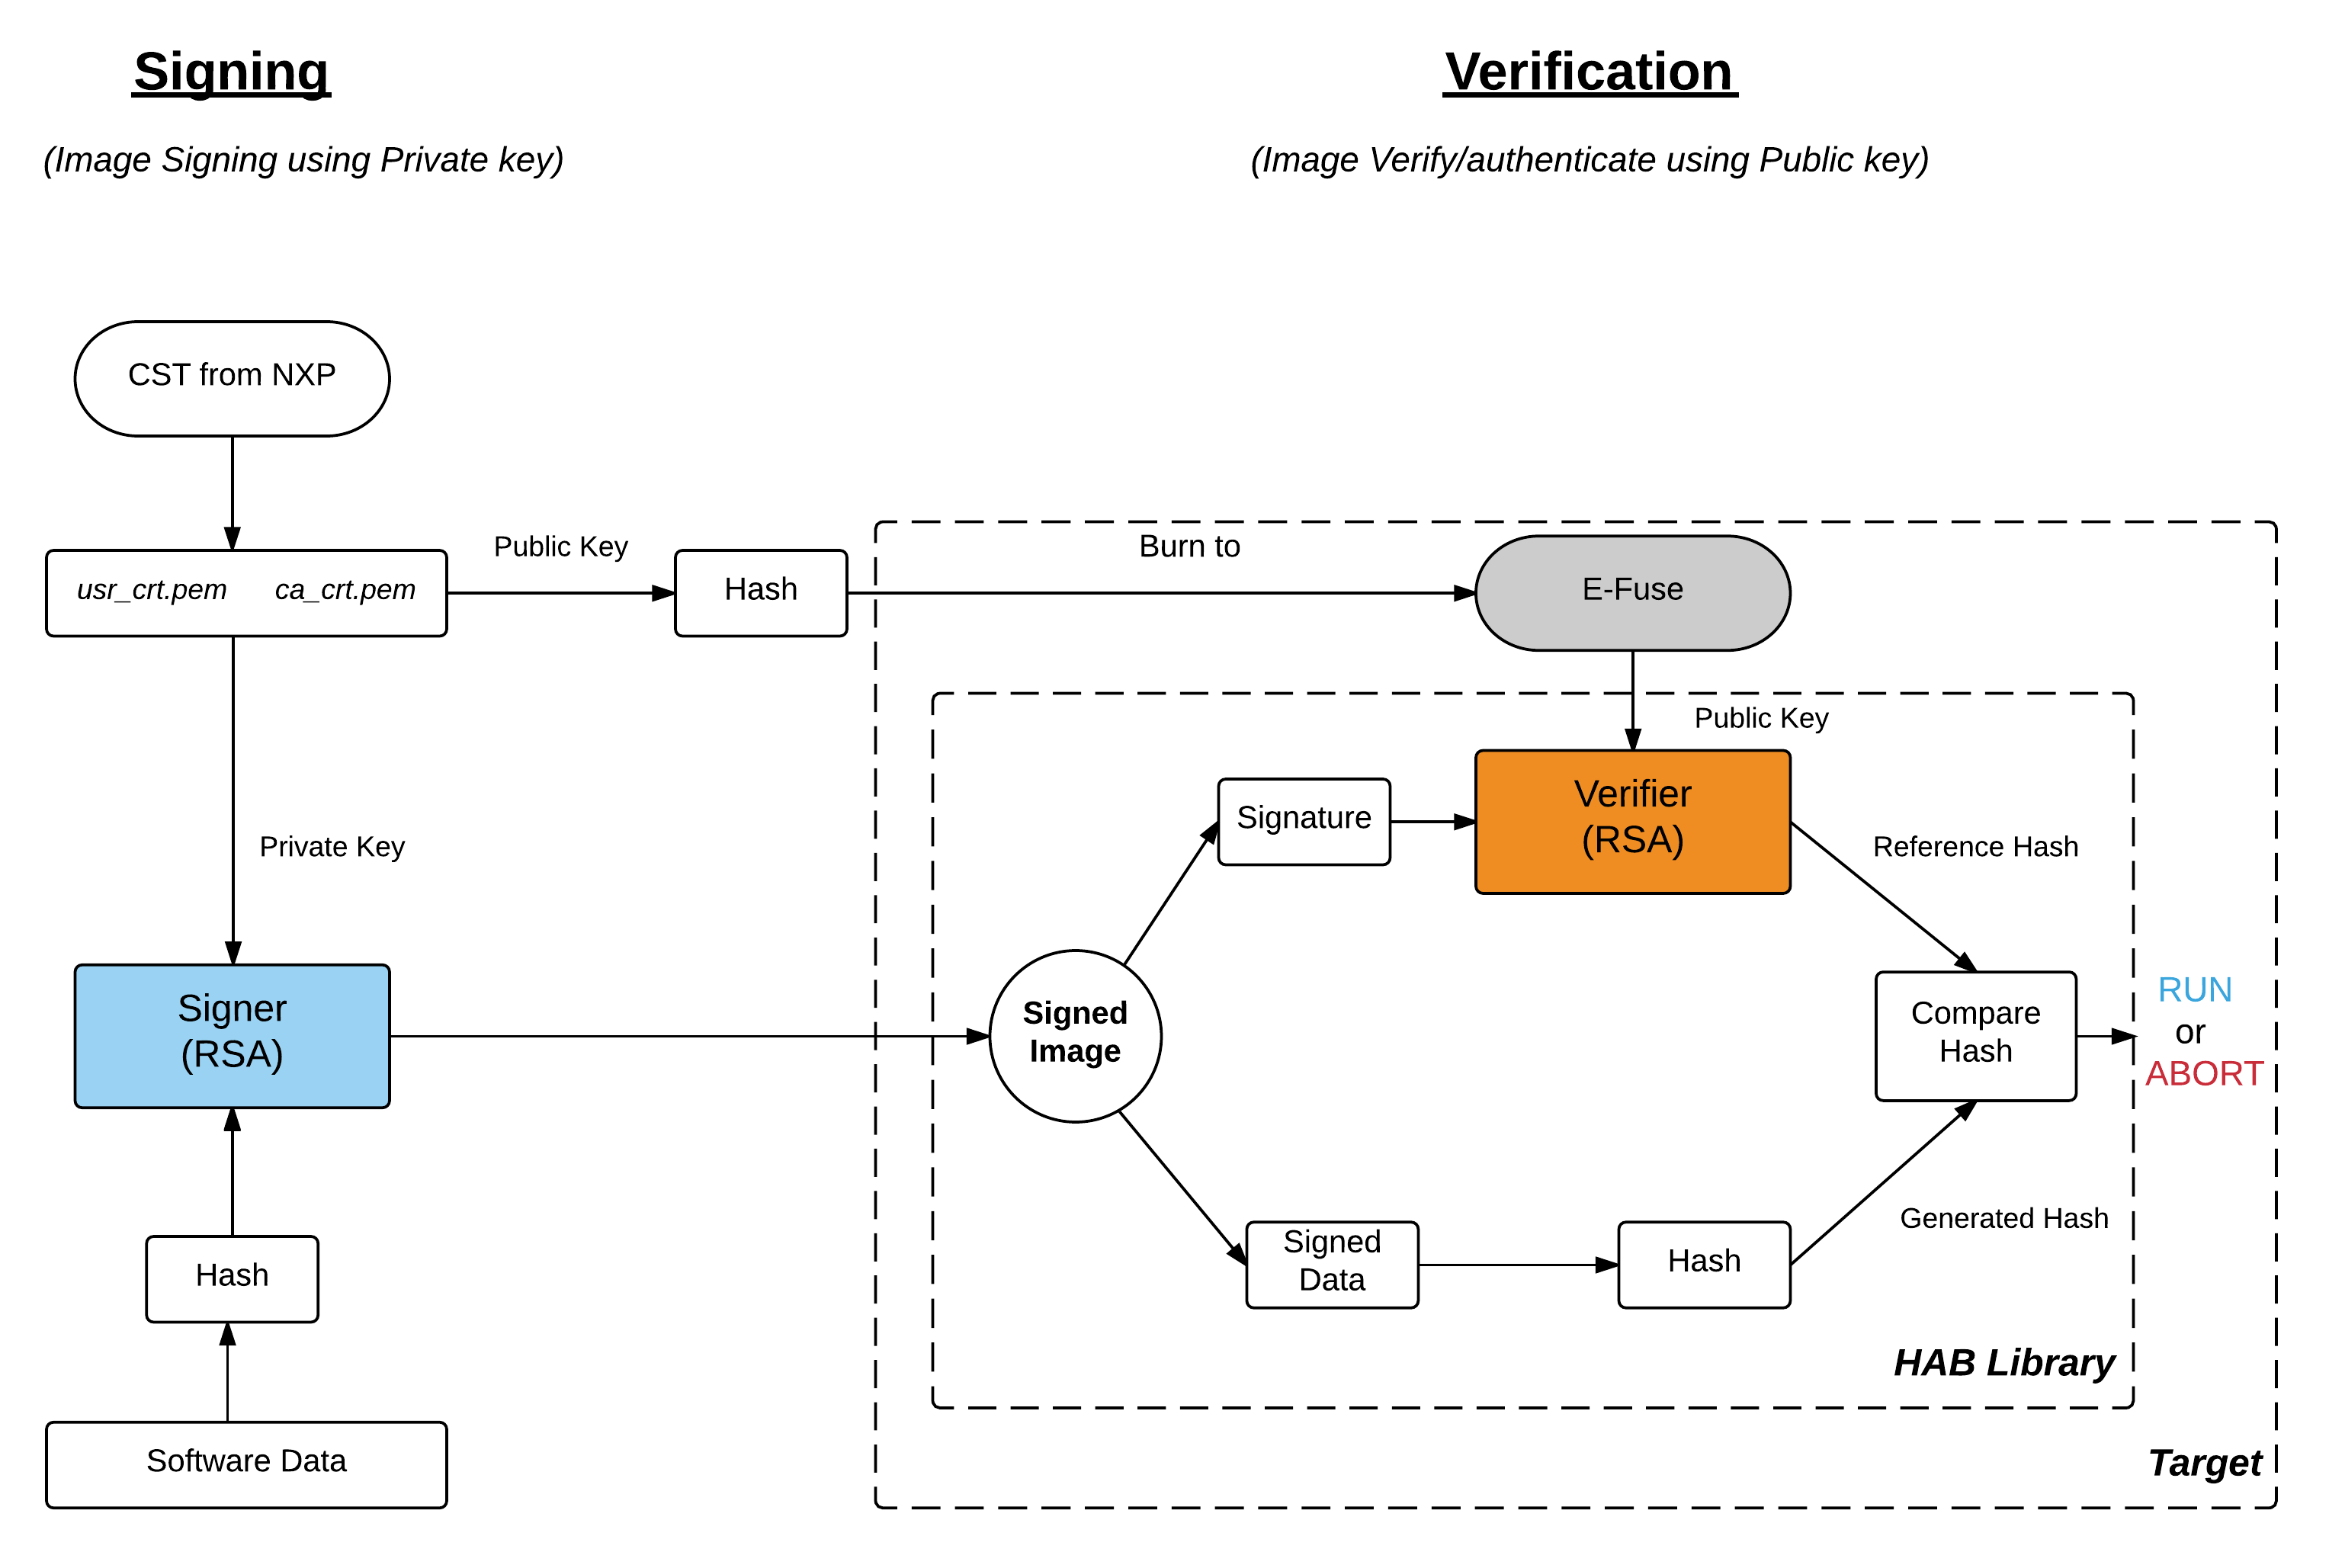
During Signing, host need to generate PKI tree, Super Root Keys, or SRK, are components of the PKI tree, then the table of public SRK should burn to E-Fuse and finally signed image can be generated using table of public SRK plus private SRKs by defining them in a format of CSF.
During Verification, HAB evaluates the SRK table included in the signature by hashing it and comparing the result to the SRK fuse values.
If the SRK verification is successful, this establishes the root of trust, and the remainder of the signature can be processed to authenticate the image.
Image Signer Flow
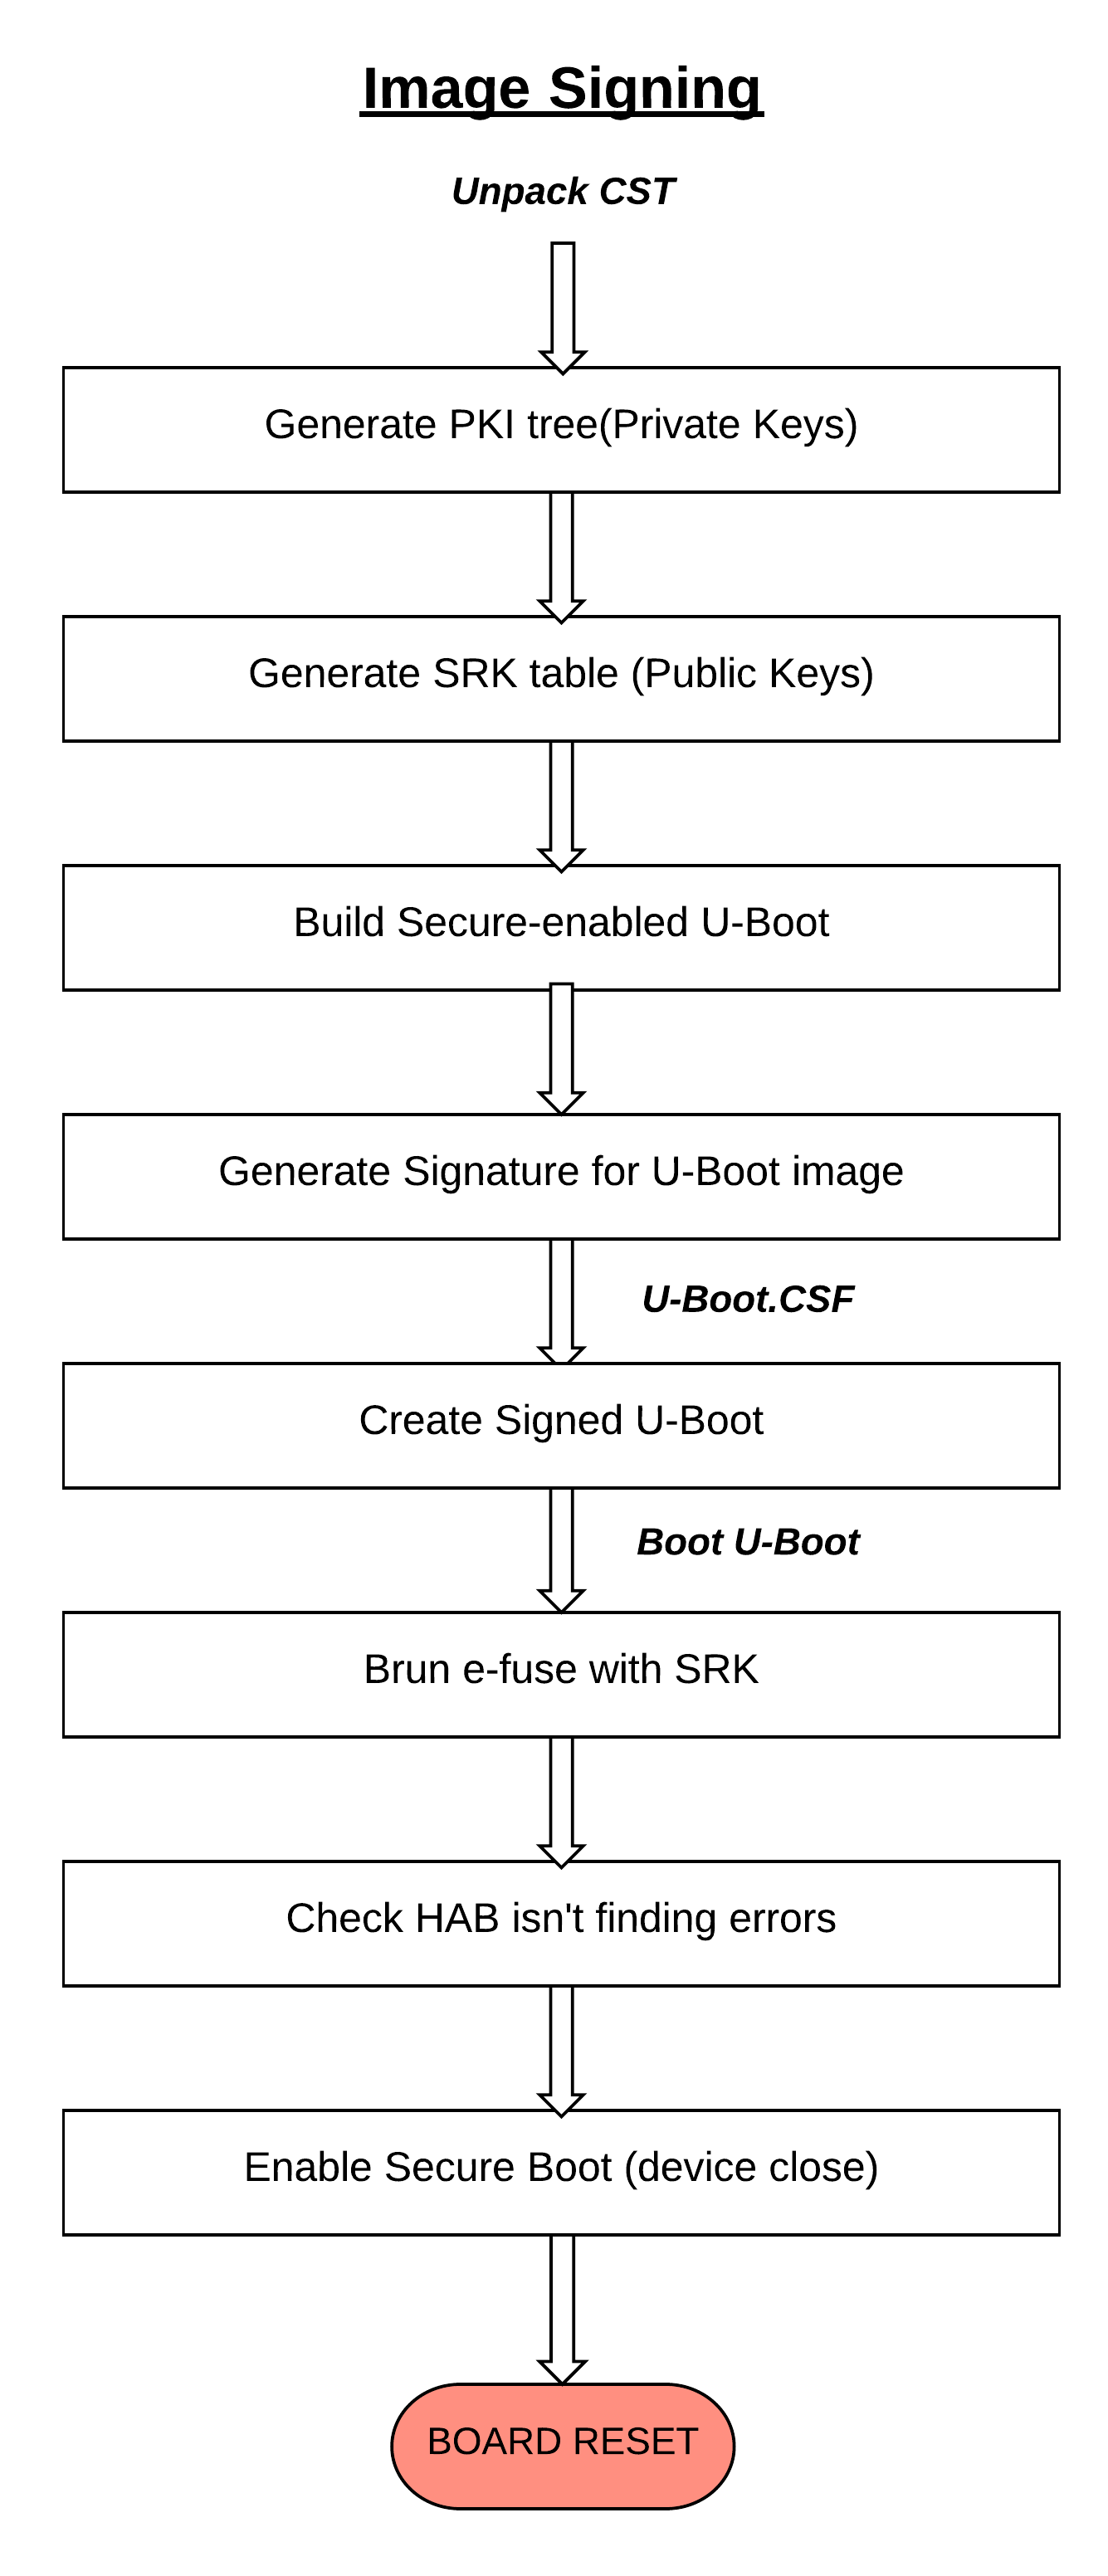
Signed Boot - Usage
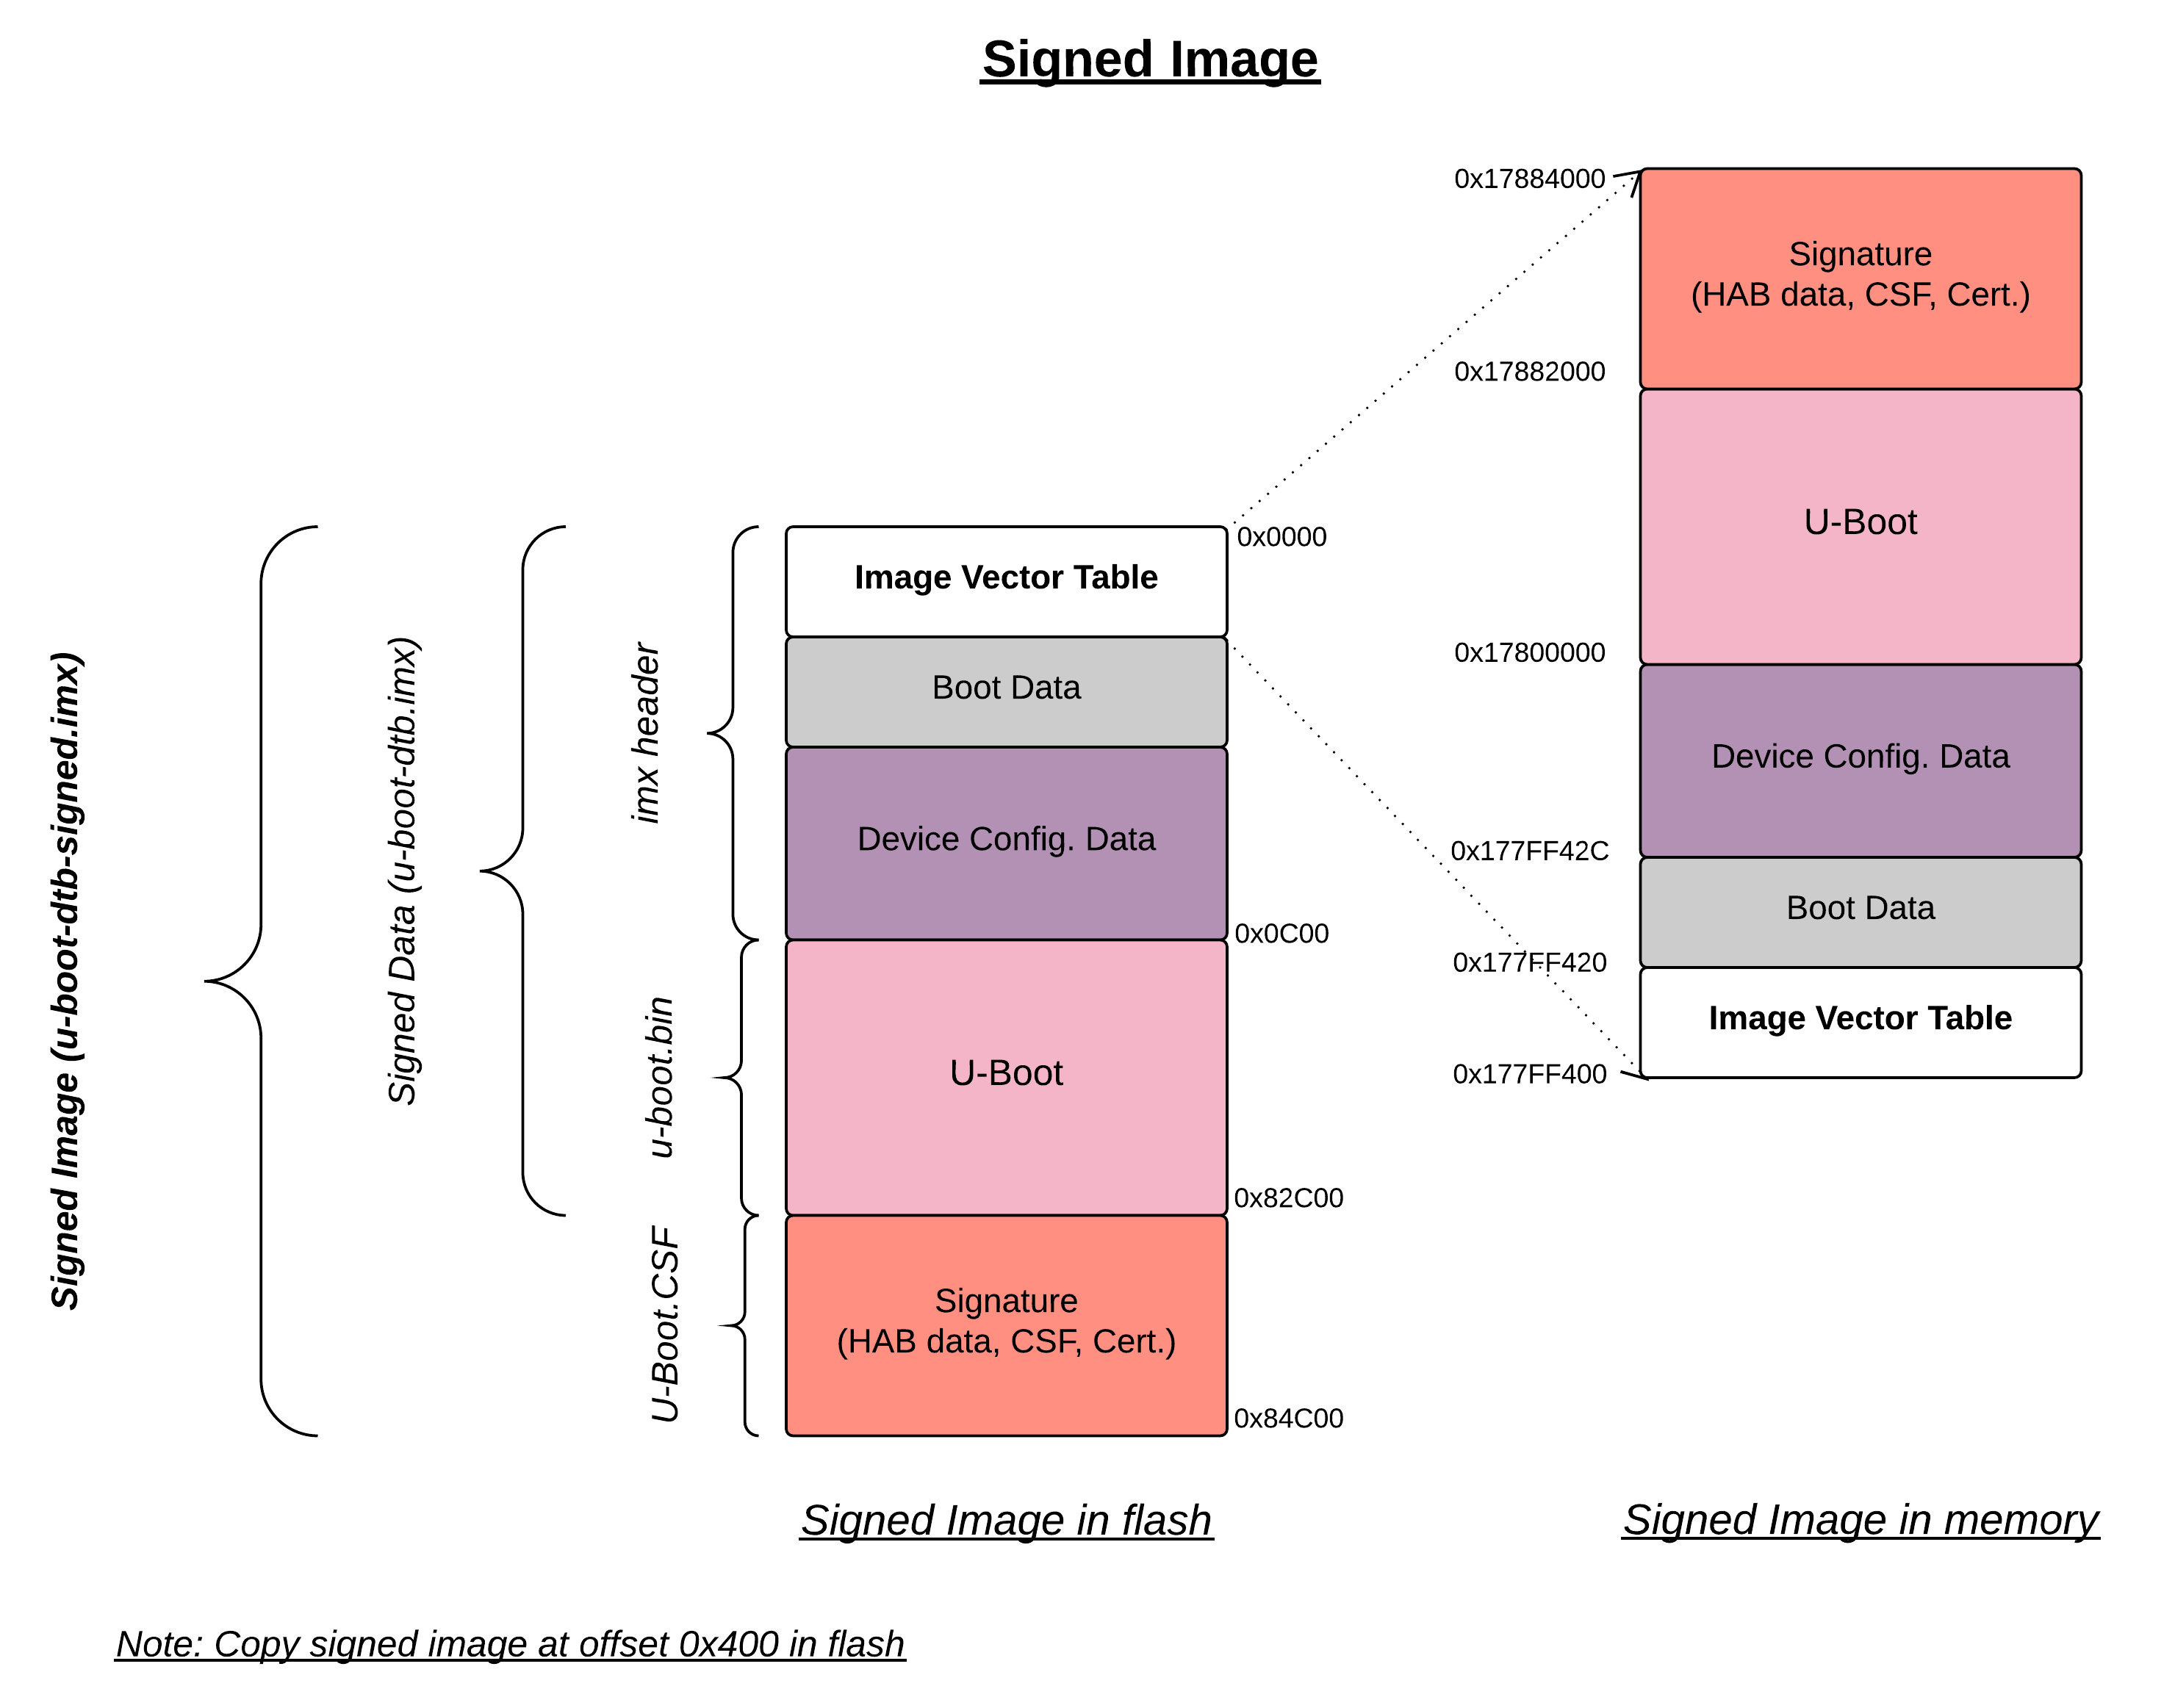
Signed Image Format (U-Boot)
The below procedure will describe an example on how signed boot has been done with Engicam i.CoreM6 Quad board.
Download cryptographic tool
$ tar xvf cst-2.3.2.tar.gz
$ cd cst-2.3.2/keys
Generate PKI tree (Private keys)
serial - 8-digit OpenSSL uses the contents of this file for the certificate serial numbers.
key_pass.txt - Contains your pass phrase that will protect the HAB code signing private keys.
$ echo "42424242" > serial
$ echo "Amarual357" > key_pass.txt

$ echo "Amarual357" >> key_pass.txt
$ ./hab4_pki_tree.sh


    +++++++++++++++++++++++++++++++++++++++++++++++++++++++++++++++

    This script is a part of the Code signing tools for Freescale's

    High Assurance Boot.  It generates a basic PKI tree.  The PKI

    tree consists of one or more Super Root Keys (SRK), with each

    SRK having two subordinate keys:

        + a Command Sequence File (CSF) key

        + Image key.

    Additional keys can be added to the PKI tree but a separate

    script is available for this.  This this script assumes openssl

    is installed on your system and is included in your search

    path.  Finally, the private keys generated are password

    protectedwith the password provided by the file key_pass.txt.

    The format of the file is the password repeated twice:

        my_password

        my_password

    All private keys in the PKI tree are in PKCS #8 format will be

    protected by the same password.


    +++++++++++++++++++++++++++++++++++++++++++++++++++++++++++++++

Do you want to use an existing CA key (y/n)?: n

Do you want to use Elliptic Curve Cryptography (y/n)?: n

Enter key length in bits for PKI tree: 2048

Enter PKI tree duration (years): 10

How many Super Root Keys should be generated? 4

Do you want the SRK certificates to have the CA flag set? (y/n)?: y
Private keys will generate on keys directory and corresponding Certificates are placed in the crts directory.
Generate SRK table (Public keys)
$ cd ../crts

$ ../linux64/srktool \

> -h 4 \

> -t SRK_1_2_3_4_table.bin \

> -e SRK_1_2_3_4_fuse.bin \

> -d sha256 \

> -c ./SRK1_sha256_2048_65537_v3_ca_crt.pem,\

> ./SRK2_sha256_2048_65537_v3_ca_crt.pem,\

> ./SRK3_sha256_2048_65537_v3_ca_crt.pem,\

> ./SRK4_sha256_2048_65537_v3_ca_crt.pem \

> -f 1
SRK_1_2_3_4_table.bin - SRK table contents with HAB data SRK_1_2_3_4_fuse.bin - contains SHA256 result to be burned to fuse
Build Secure-enabled U-Boot
u-boot> git clone https://github.com/openedev/u-boot-amarula.git -b hab

u-boot> make imx6q_icore_mmc_defconfigu-boot> make
u-boot> cat u-boot-dtb.imx.log

Image Type:   Freescale IMX Boot Image

Image Ver:    2 (i.MX53/6/7 compatible)

Mode:         DCD

Data Size:    536576 Bytes = 524.00 KiB = 0.51 MiB

Load Address: 177ff420

Entry Point:  17800000

HAB Blocks:   177ff400 00000000 00082c00

DCD Blocks:   00910000 0000002c 00000328
Generate Signature for U-Boot Image
$ cd ~/cst-2.3.2/linux64
$ cat U-Boot.CST

[Header]

Version = 4.1

Security Configuration = Open

Hash Algorithm = sha256

Engine Configuration = 0

Certificate Format = X509

Signature Format = CMS

Engine = CAAM


[Install SRK]

File = "../crts/SRK_1_2_3_4_table.bin"

Source index = 0


[Install CSFK]

File = "../crts/CSF1_1_sha256_4096_65537_v3_usr_crt.pem"


[Authenticate CSF]


[Install Key]

# Key slot index used to authenticate the key to be installed

Verification index = 0


# Key to install

Target index = 2

File = "../crts/IMG1_1_sha256_4096_65537_v3_usr_crt.pem"


[Authenticate Data]

Verification index = 2

Blocks = 0x177ff400 0x0 0x82c00 "u-boot-dtb.imx"

$ cp u-boot/u-boot-dtb.imx .
$ ./cst --o U-Boot_CSF.bin --i U-Boot.CSF

CSF Processed successfully and signed data available in U-Boot_CSF.bin
Create Signed U-Boot
$ objcopy -I binary -O binary --pad-to 0x2000 --gap-fill=0x00 U-Boot_CSF.bin U-Boot_CSF_pad.bin
$ cat u-boot-dtb.imx U-Boot_CSF_pad.bin > u-boot-dtb-signed.imx
$ dd if=u-boot-dtb-signed.imx of=/dev/sda bs=1K seek=1 && sync
<< Put SD card and power-on the board >>
Burn e-fuse with SRK
efuse dump

$ cd ../crts

$ hexdump -e '/4 "0x"' -e '/4 "%X""\n"' < SRK_1_2_3_4_fuse.bin

0x67C7506F

0x7D51EFD0

0x9E450811

0x74ED8483

0xB774A2A

0xD33FF045

0x3343F187

0xC86DDA92
Burn on efuse

U-Boot 2017.05-rc2-00058-g7d6c4ef (Apr 25 2017 - 11:30:36 +0530)


CPU:   Freescale i.MX6Q rev1.2 at 792MHz

CPU:   Industrial temperature grade (-40C to 105C) at 53C

Reset cause: POR

Model: Engicam i.CoreM6 Quad/Dual Starter Kit

DRAM:  2 GiB

MMC:   FSL_SDHC: 0

*** Warning - bad CRC, using default environment


No panel detected: default to Amp-WD

Display: Amp-WD (800x480)

In:    serial

Out:   serial

Err:   serial

switch to partitions #0, OK

mmc0 is current device

Net:

Error: ethernet@02188000 address not set.

No ethernet found.

Hit any key to stop autoboot:  0
icorem6qdl> fuse prog -y 3 0 0x67C7506F

Programming bank 3 word 0x00000000 to 0x67c7506f...

icorem6qdl> fuse prog -y 3 1 0x7D51EFD0

Programming bank 3 word 0x00000001 to 0x7d51efd0...

icorem6qdl> fuse prog -y 3 2 0x9E450811

Programming bank 3 word 0x00000002 to 0x9e450811...

icorem6qdl> fuse prog -y 3 3 0x74ED8483

Programming bank 3 word 0x00000003 to 0x74ed8483...

icorem6qdl> fuse prog -y 3 4 0xB774A2A

Programming bank 3 word 0x00000004 to 0x0b774a2a...

icorem6qdl> fuse prog -y 3 5 0xD33FF045

Programming bank 3 word 0x00000005 to 0xd33ff045...

icorem6qdl> fuse prog -y 3 6 0x3343F187

Programming bank 3 word 0x00000006 to 0x3343f187...

icorem6qdl> fuse prog -y 3 7 0xC86DDA92

Programming bank 3 word 0x00000007 to 0xc86dda92...
Check HAB isn’t finding ERRORS?
icorem6qdl> hab_status


Secure boot disabled


HAB Configuration: 0xf0, HAB State: 0x66

No HAB Events Found!
HAB authentication works fine, and the hab_status show ‘No HAB Events Found!’ So the device is open now try to close for enabling Secure boot
Enable Secure boot
Be careful with this step and if you’re sure with all steps above and hab_status should show ‘No HAB Events Found!’ Once this setup executed, chip will only boot an image signed with the keys that match the SRK blown fuses.
icorem6qdl> fuse prog 0 6 0x2

Programming bank 0 word 0x00000006 to 0x00000002...

Warning: Programming fuses is an irreversible operation!

         This may brick your system.

         Use this command only if you are sure of what you are doing!


Really perform this fuse programming? <y/N>

y

icorem6qdl> reset

resetting ...


U-Boot 2017.05-rc2-00058-g5c41464-dirty (Apr 25 2017 - 13:11:59 +0530)


CPU:   Freescale i.MX6Q rev1.2 at 792MHz

CPU:   Industrial temperature grade (-40C to 105C) at 49C

Reset cause: WDOG

Model: Engicam i.CoreM6 Quad/Dual Starter Kit

DRAM:  2 GiB

MMC:   FSL_SDHC: 0

*** Warning - bad CRC, using default environment


No panel detected: default to Amp-WD

Display: Amp-WD (800x480)

In:    serial

Out:   serial

Err:   serial

switch to partitions #0, OK

mmc0 is current device

Net:

Error: ethernet@02188000 address not set.

No ethernet found.

Hit any key to stop autoboot:  0

icorem6qdl> hab_

  hab_auth_img hab_status

icorem6qdl> hab_status


Secure boot enabled


HAB Configuration: 0xcc, HAB State: 0x99

No HAB Events Found!
HAB - Encrypted boot
Encrypted Boot Flow
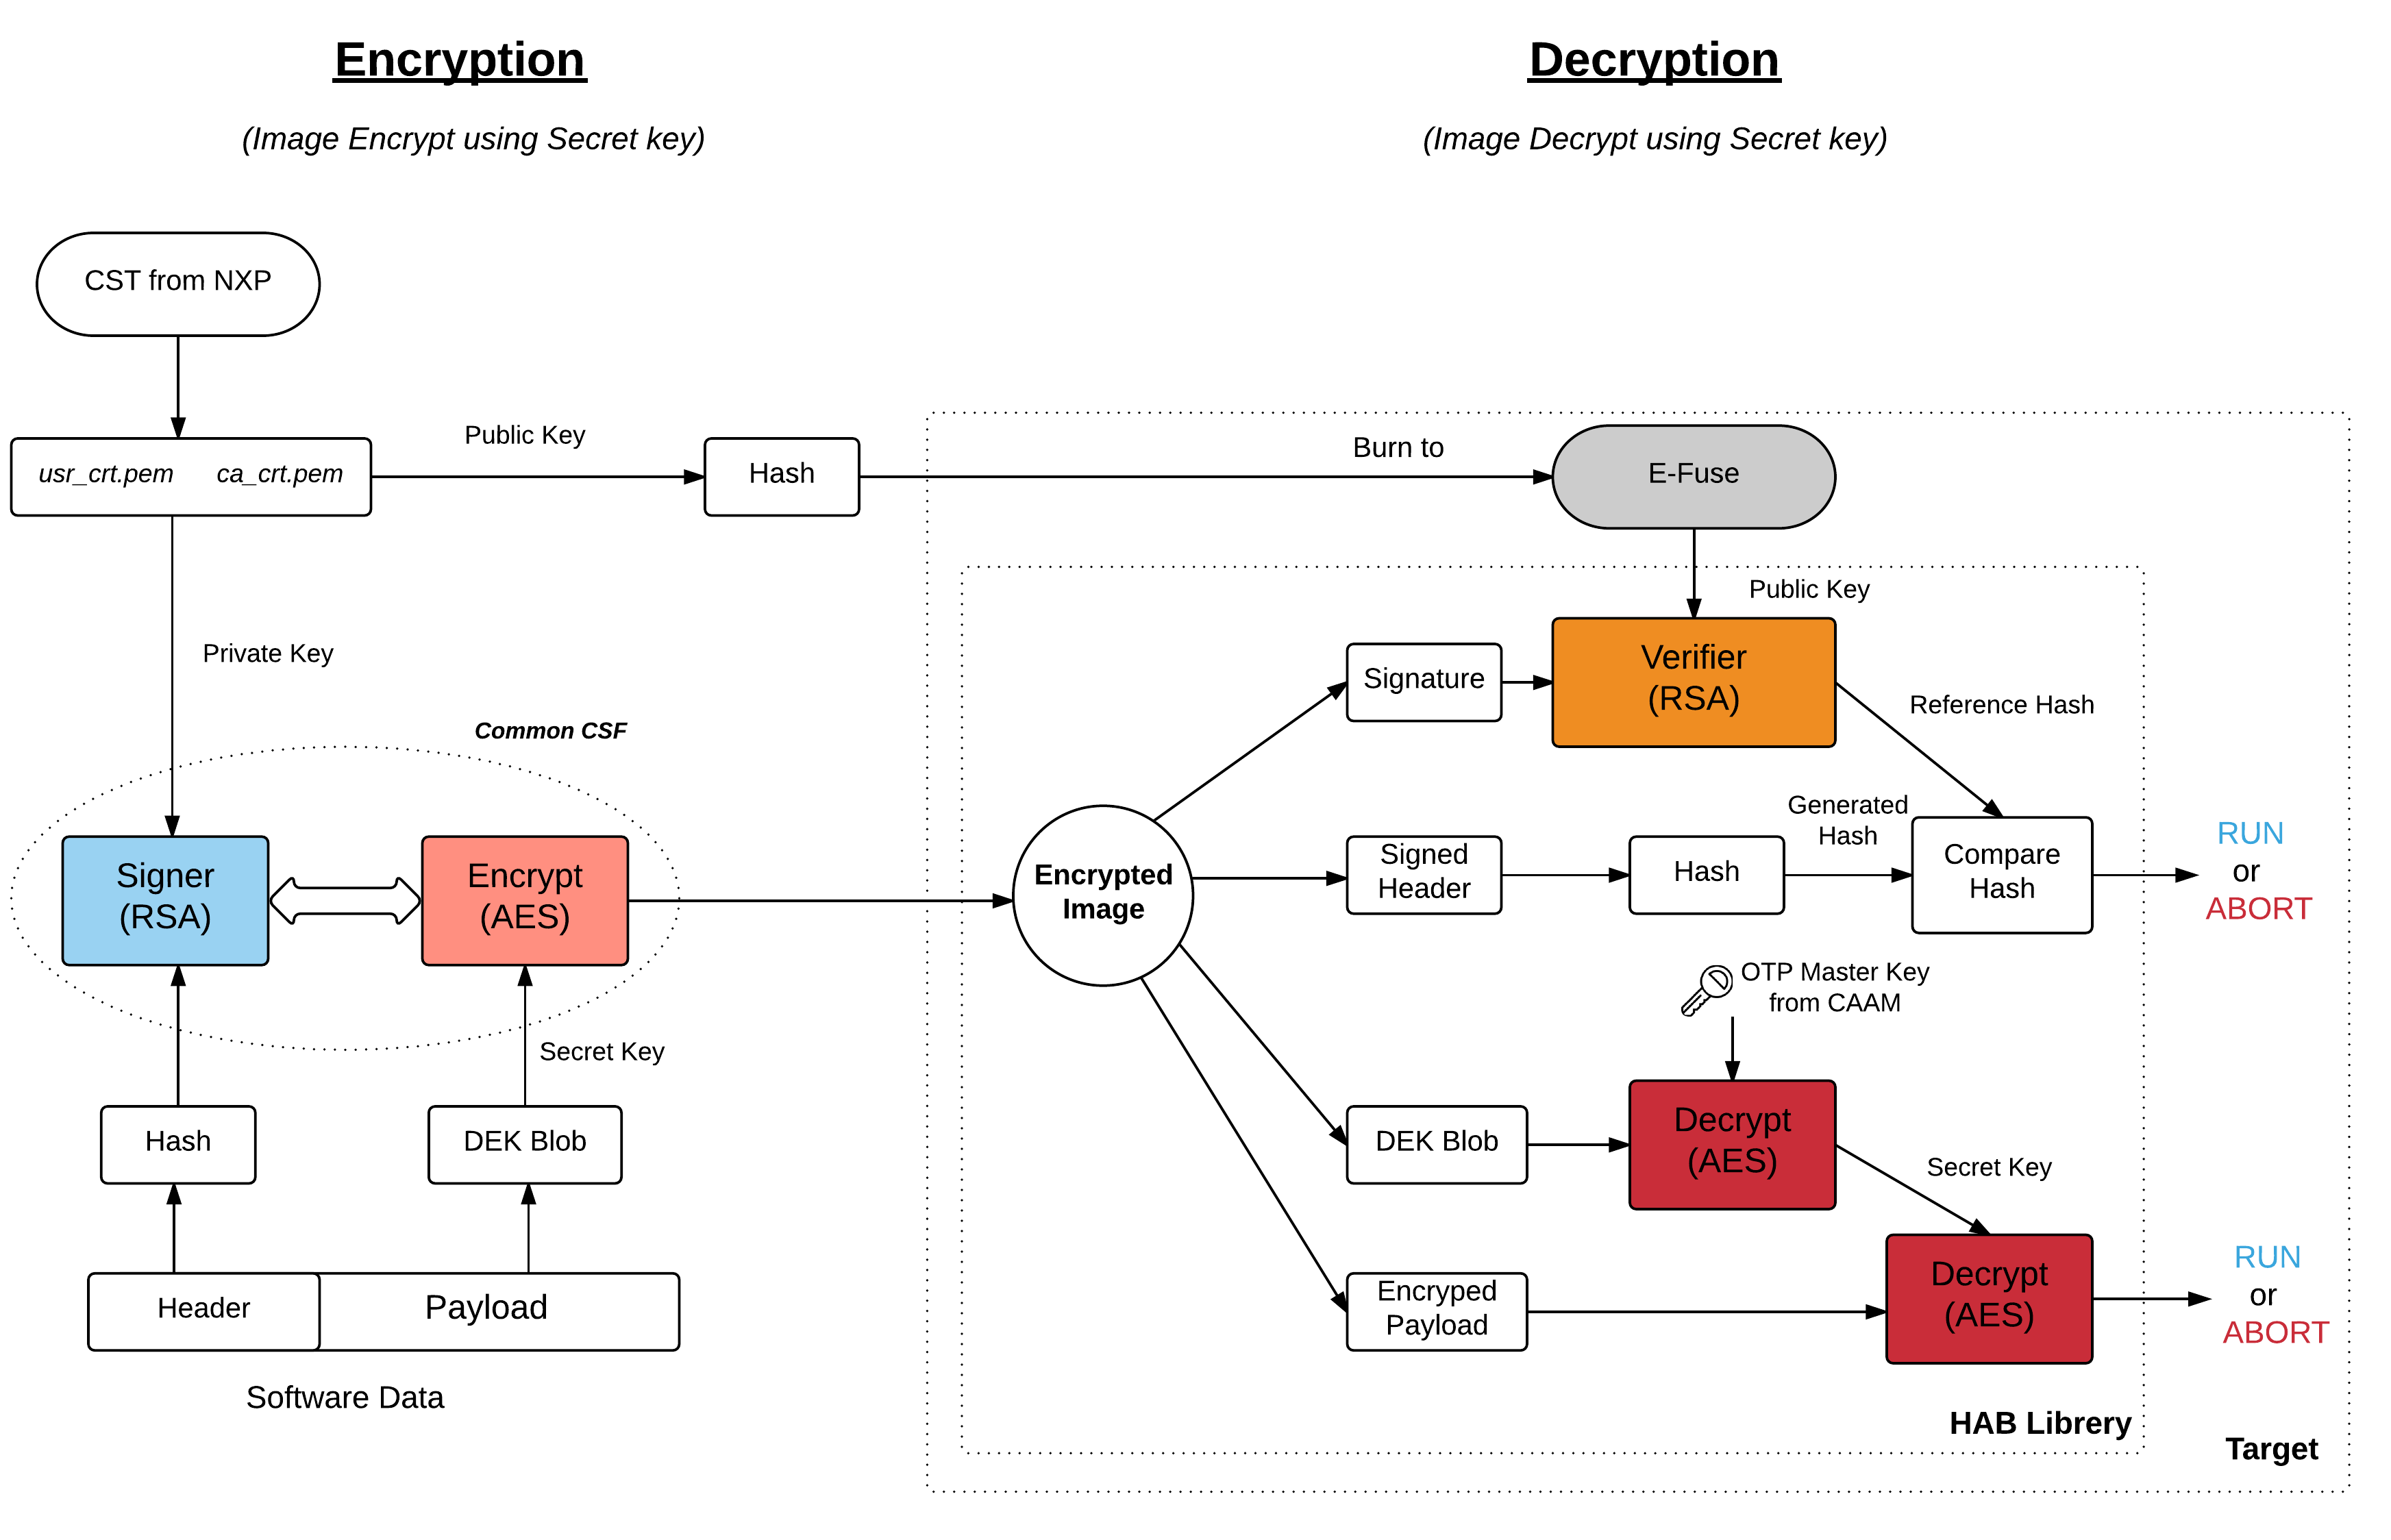
During Encryption, host need to follow similar steps as Signing process for ‘Header’ of Software Data. then the table of public SRK should burn to E-Fuse and finally payload cab be encrypted using table of public SRK, private SRKs, and DEK_blob(secret key) by defining them in a format of CSF.
DEK(dek.bin) is generated by cst_encrypt during encryption process but
The problem then is how do we protect the DEK since it is required on the IC to decrypt the image at boot time? The solution is to create a DEK blob.
How to generate DEK_blob? Target will encrypt the DEK using OTPMK from CAAM.
During Decryption, First HAB evaluates the SRK table included in the signature by hashing it and comparing the result to the SRK fuse values like Verification process and HAB evaluates secrete key by decrypt the DEK_blob using OTPMK and encrypted payload is further decrypt using secrete key ie generated before.
Image Encrypt Flow
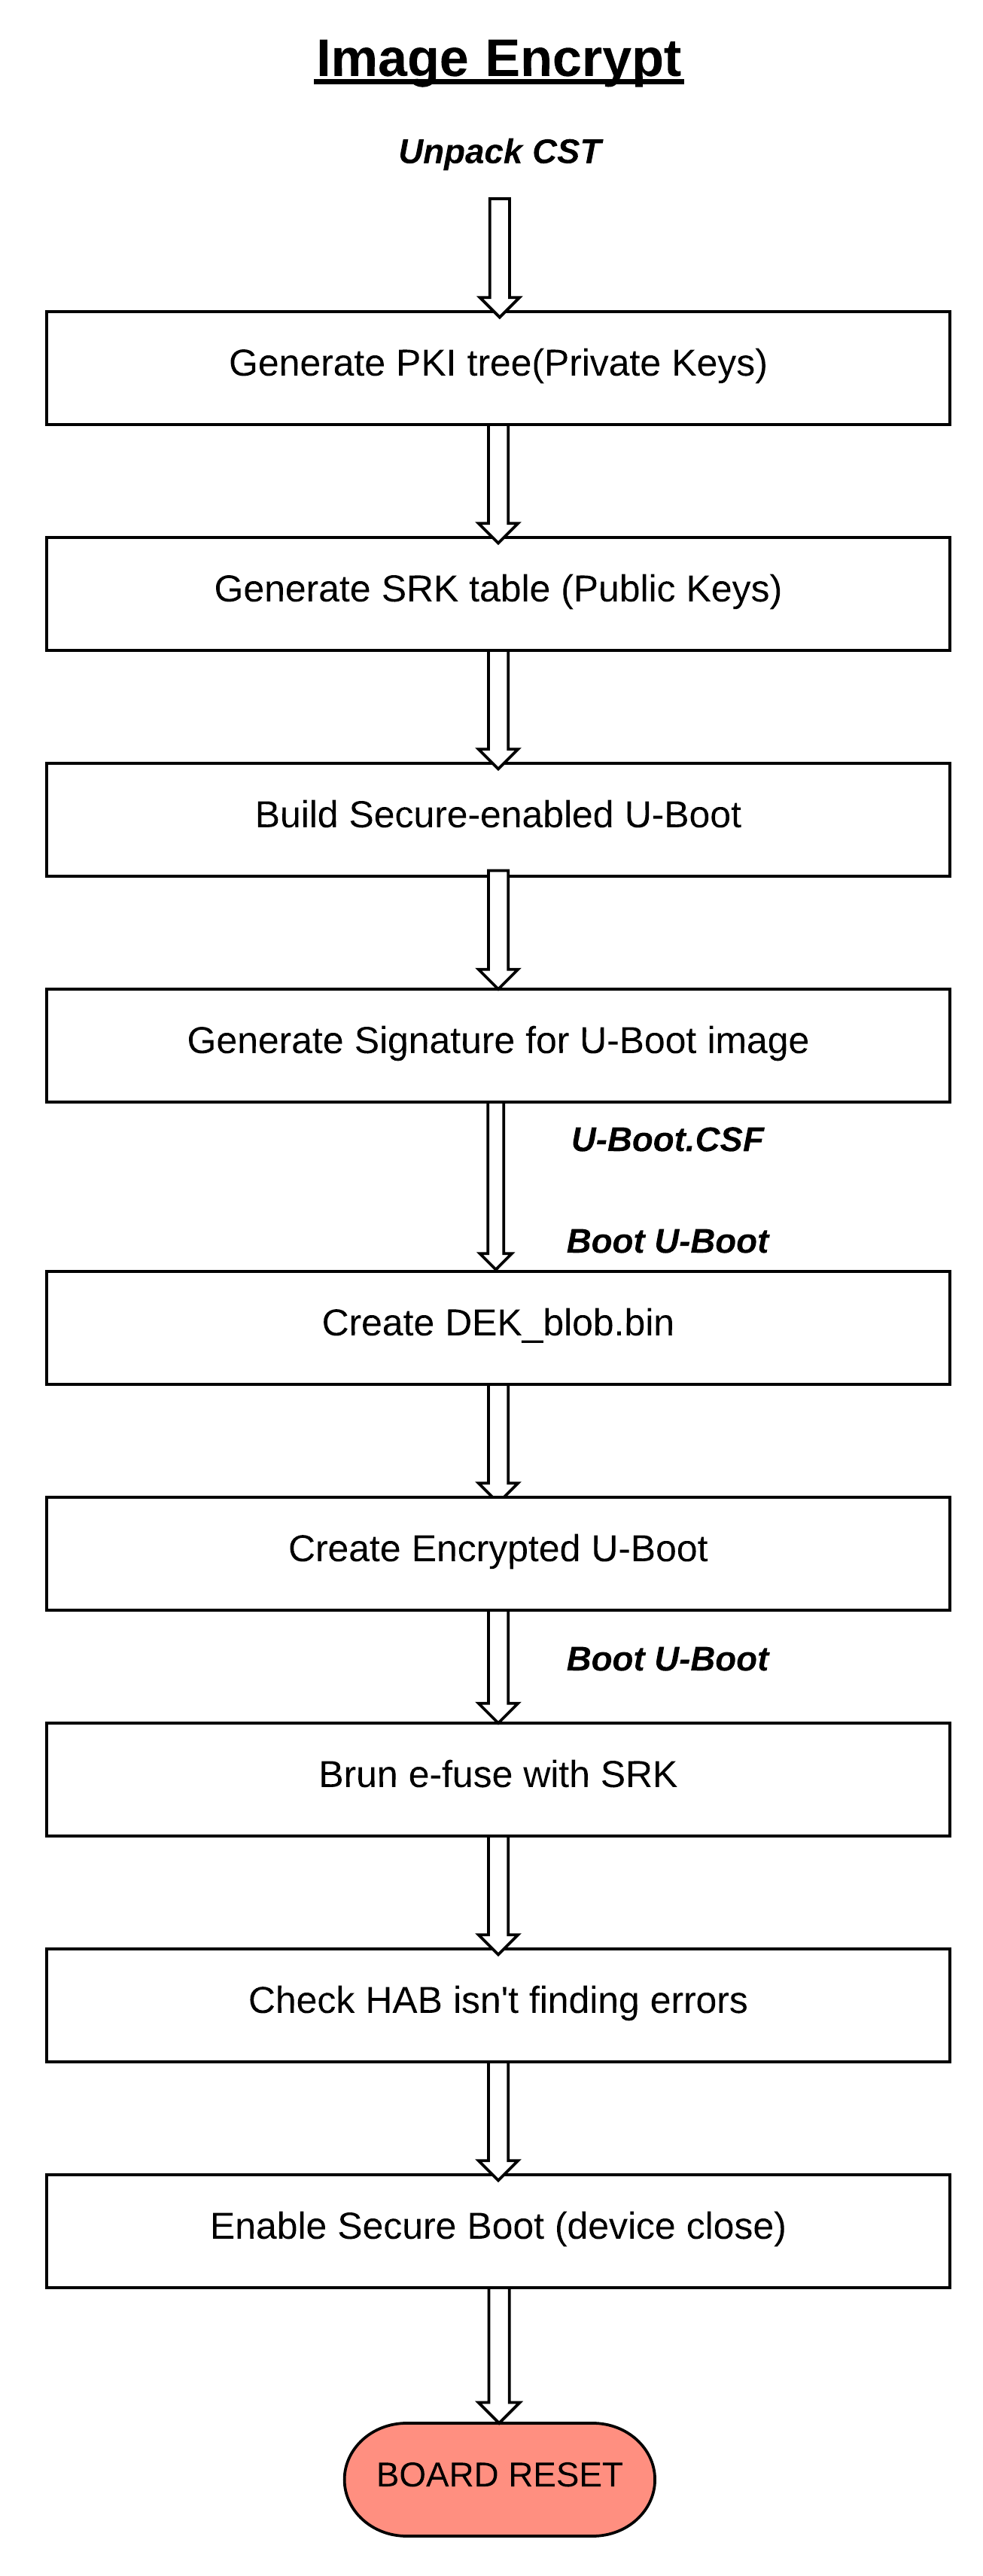
Encrypted boot - Usage
Encrypted Image Format (U-Boot)

The below procedure will describe an example on how encrypted boot has been done with Engicam i.CoreM6 Quad board.
See the same steps in Signed Boot - Usage PKI tree, SRK table and E-fuse burn.
Generate Signature for U-Boot Image
CST from NXP doesn’t allow to use encryption, so you need to build a new binary
$ cd ~/cst-2.3.2/code/back_end/src
$ gcc -o cst_encrypt -I ../hdr -L ../../../linux64/lib *.c -lfrontend -lcrypto
$ cp cst_encrypt ../../../linux64/
$ cd ~/cst-2.3.2/linux64
$ cat U-Boot.CST

[Header]

Version = 4.1

Hash Algorithm = SHA256

Engine Configuration = 0

Certificate Format = X509

Signature Format = CMS

Engine = CAAM


[Install SRK]

File = "../../crts/SRK_1_2_3_4_table.bin"

Source index = 0


[Install CSFK]

File = "../../crts/CSF1_1_sha256_2048_65537_v3_usr_crt.pem"


[Authenticate CSF]


[Unlock]

Engine = CAAM

Features = RNG


[Install Key]

# Key slot index used to authenticate the key to be installed

Verification index = 0

# Key to install

Target index = 2

File = "../../crts/IMG1_1_sha256_2048_65537_v3_usr_crt.pem"


[Authenticate Data]

Verification index = 2

Blocks = 0x177ff400 0x0 0xC00 "u-boot-dtb.imx"


#Encrypt the boot image and create a DEK

[Install Secret Key]

Verification Index = 0

Target Index = 0

Key = "dek.bin"

Key Length = 128

Blob Address = 0x17883FB8


#Provide DEK blob location to decrypt

[Decrypt Data]

Verification Index = 0

Mac Bytes = 16

Blocks = 0x17800000 0x00000C00 0x82000 "u-boot-dtb.imx"

$ cp u-boot/u-boot-dtb.imx .
$ ./cst_encrypt --o U-Boot_CSF.bin --i U-Boot.CSF

CSF Processed successfully and signed data available in U-Boot_CSF.bin
Create DEK_blob
Once dek.bin generated by cst_encrypt need to protect the dek.bin by creating DEK_blob.bin at target
icorem6qdl>

fatload mmc 0:1 0x10800000 dek.bin

reading dek.bin

16 bytes read in 11 ms (1000 Bytes/s)

icorem6qdl> dek_blob 0x10800000 0x10801000 128

SEC0: RNG instantiated


Encapsulating provided DEK to form blob

DEK Blob

8100484166551000307CB52A999D6D9191D4D7C479DE7DF60A13C0EA7D9ACF92D9491CEA82B91C6F194EC134D9B63005
36F20FFD063C8700F4513BE57F7C7BE43E038C1133138757

icorem6qdl> fatwrite mmc 0 0x10801000 DEK_blob.bin 0x48

writing DEK_blob.bin

72 bytes written
Create Encrypted U-Boot
$ objcopy -I binary -O binary --pad-to=0x1FB8 --gap-fill=0x00 U-Boot_CSF.bin U-Boot_CSF_pad.bin
$ cat cat u-boot-dtb.imx U-Boot_CSF_pad.bin DEK_blob.bin > u-boot-dtb-encrypte.imx
$ dd if=u-boot-dtb-encrypted.imx of=/dev/sda bs=1K seek=1 && sync
HAB - Signed uImage
Now that your bootloader image is properly authenticated/encrypted and that your device is secured, you can sign your kernel image so U-Boot ensures to load a known version.
Here are the details of Signing uImage from linux-next.
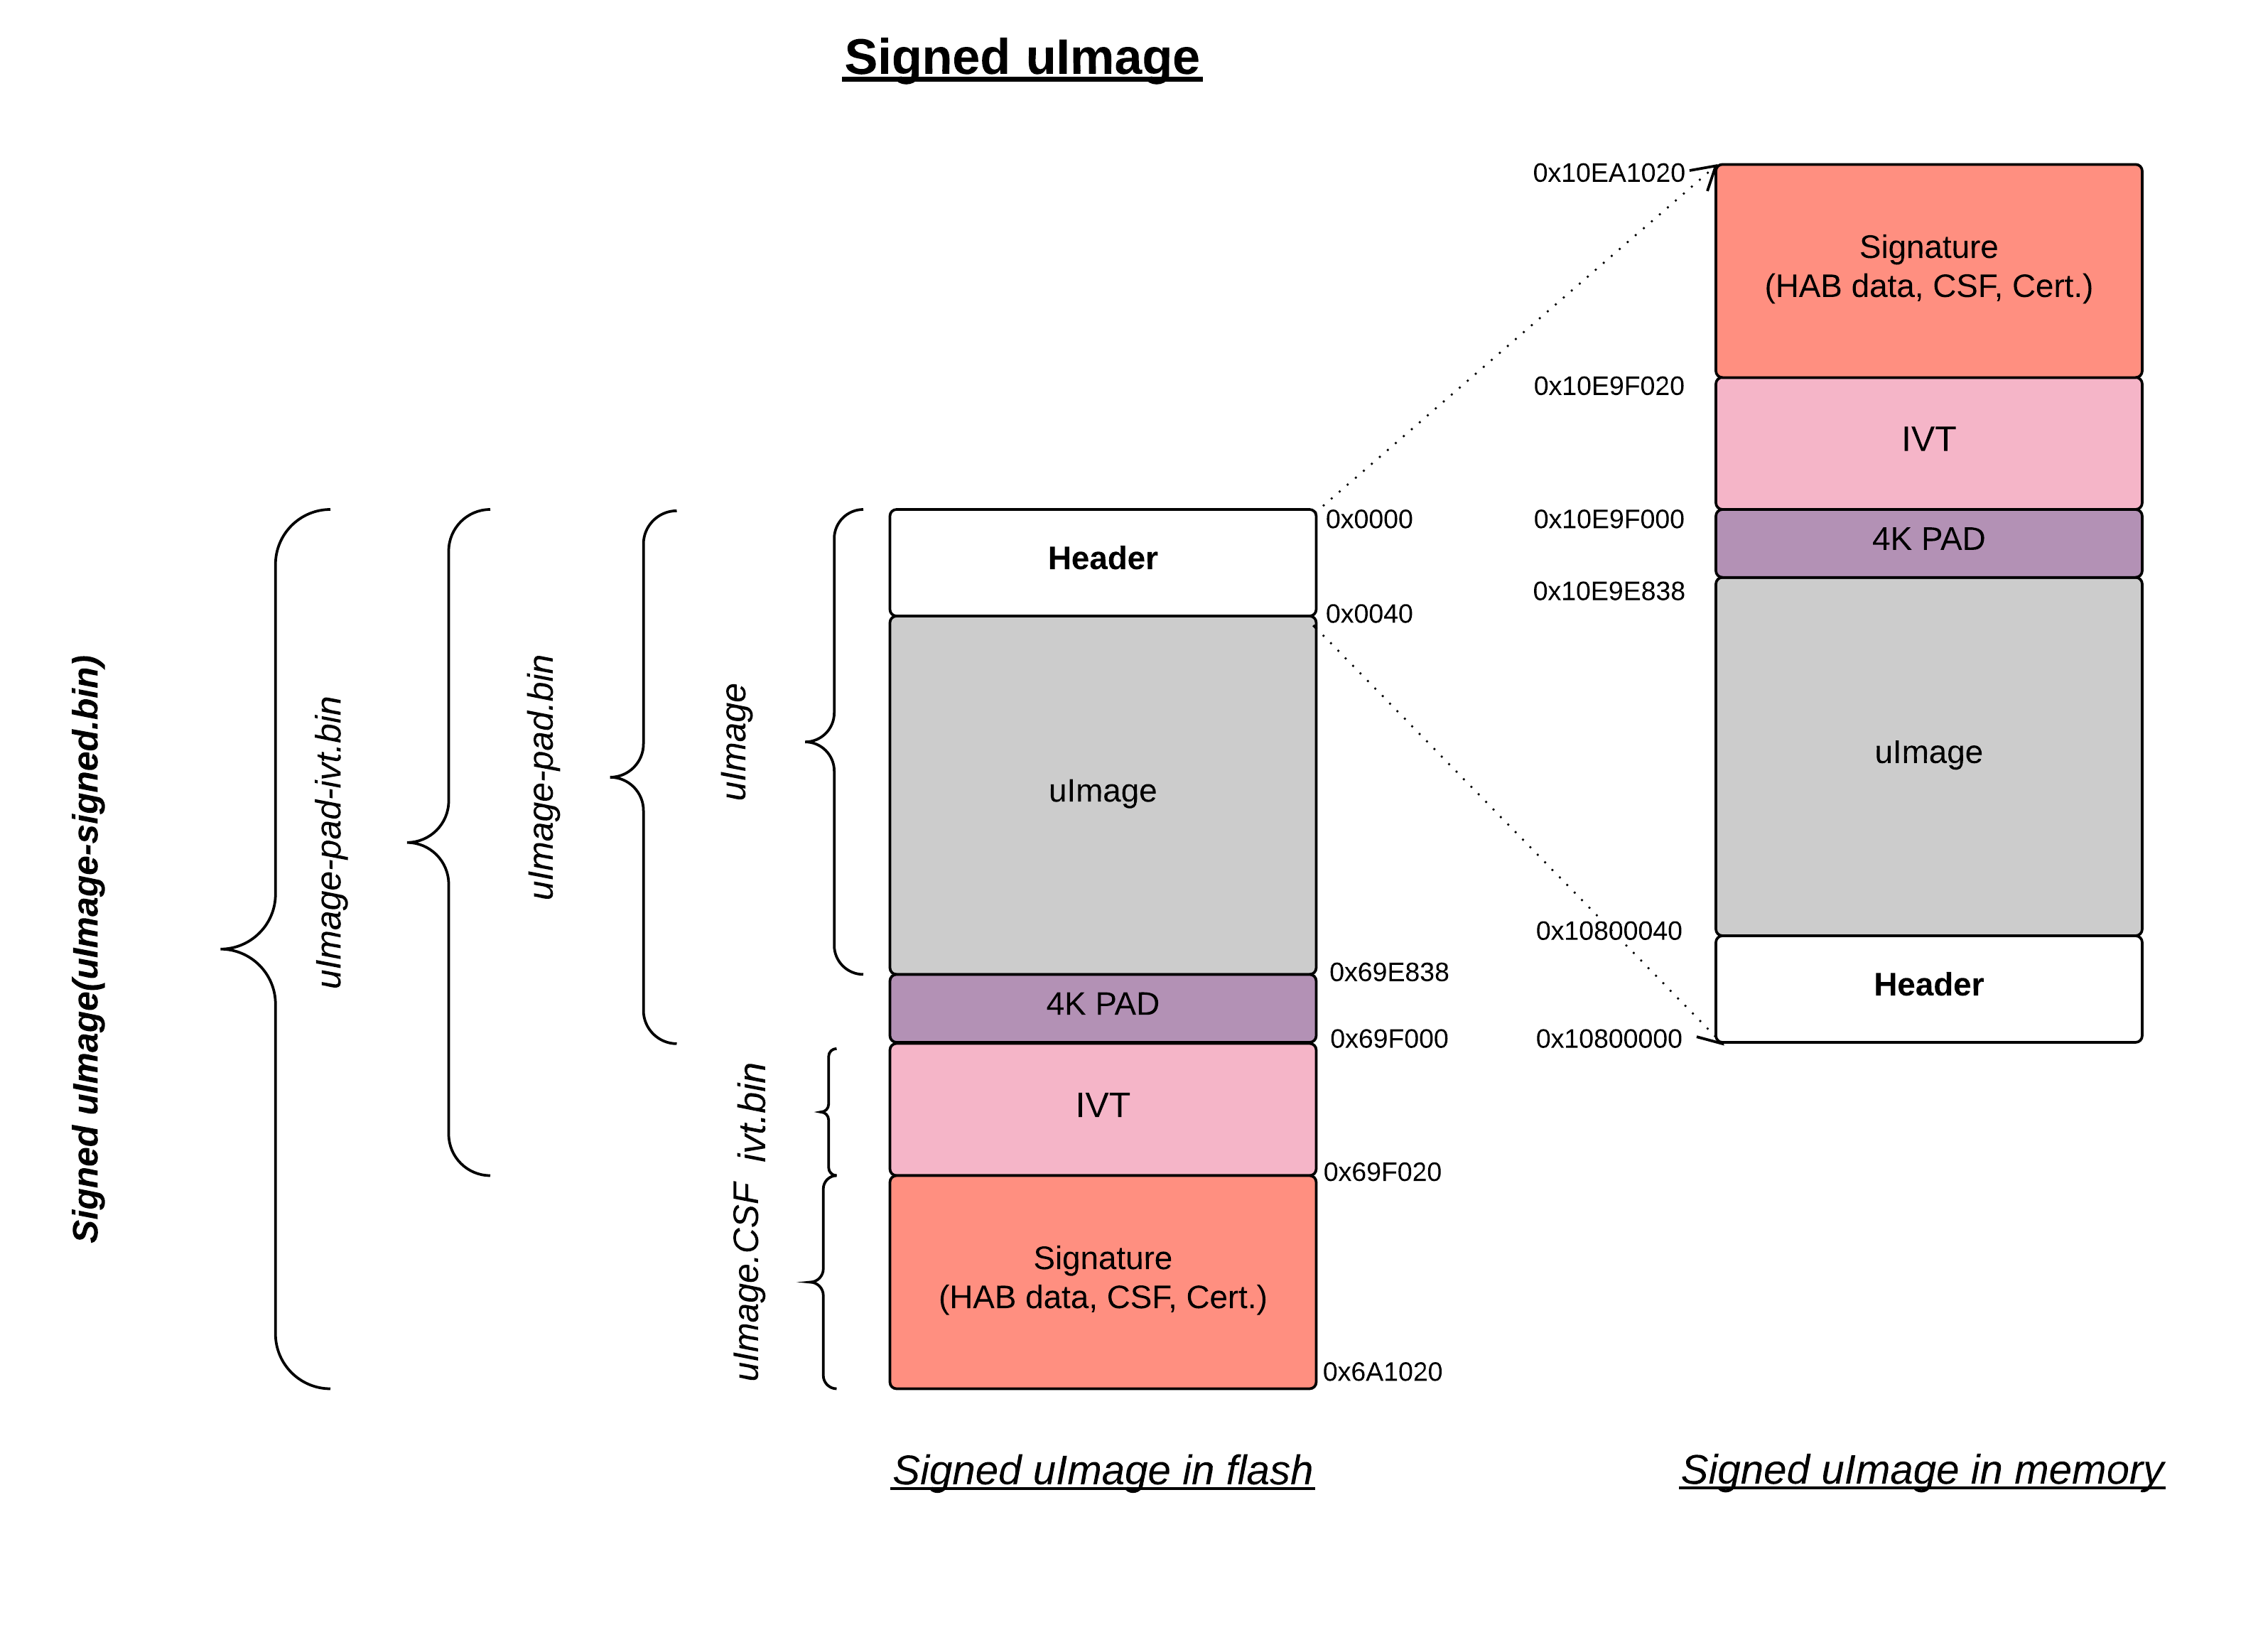
Signed uImage Format
See uImage format, which built from linux-next tree
$ mkimage -l uImage

Image Name:   Linux-4.11.0-next-20170510

Created:      Wed May 10 21:27:58 2017

Image Type:   ARM Linux Kernel Image (uncompressed)

Data Size:    6940664 Bytes = 6777.99 kB = 6.62 MB

Load Address: 10008000
See the same uImage is fitting on memory after proper signed, just numerical understanding nevertheless same procedure as with “HAB - Signed Boot”
Signed uImage Creation
Use the same PKI tree and SRK keys that been tested with U-Boot and proceed with “Image Signer Flow” of U-Boot except the numerical difference, nevertheless the same procedure.
4K PAD
Since Linux follows 4K pagesize format for Image process, So pad the built uImage to nearest 4K padding. here the actual uImage size is 0x69E838 after nearest 4K padding it becomes 0x69F000.
$ objcopy -I binary -O binary --pad-to=0x69F000 --gap-fill=0x00 uImage uImage-pad.bin
Generate IVT
By default imx header attach the IVT for U-Boot (u-boot-dtb.imx), but Linux we need to explicitly attach the IVT based on the perl script as below.
Size of the IVT is 0x20 bytes
Self pointer size is the uImage size once padded to 4K
CSF pointer size is Self pointer + 0x20
$ cat genIVT

#! /usr/bin/perl -w

use strict;

open(my $out, '>:raw', 'ivt.bin') or die "Unable to open: $!";

print $out pack("V", 0x412000D1); # IVT Header

print $out pack("V", 0x10801000); # Jump Location

print $out pack("V", 0x0); # Reserved

print $out pack("V", 0x0); # DCD pointer

print $out pack("V", 0x0); # Boot Data

print $out pack("V", 0x10E9F000); # Self Pointer

print $out pack("V", 0x10E9F020); # CSF Pointer

print $out pack("V", 0x0); # Reserved

close($out);
Create IVT uImage
Build the genIVT that should create ivt.bin
$ perl genIVT
Attach ivt.bin to padded uImage
$ cat uImage-pad.bin ivt.bin > uImage-pad-ivt.bin
Create CSF uImage
Create uImage.CSF file and build the binary.
$ cat uImage.CSF

[Header]

Version = 4.1

Security Configuration = Open

Hash Algorithm = sha256

Engine Configuration = 0

Certificate Format = X509

Signature Format = CMS

Engine = CAAM


[Install SRK]

File = "../../crts/SRK_1_2_3_4_table.bin"

Source index = 0


[Install CSFK]

File = "../../crts/CSF1_1_sha256_2048_65537_v3_usr_crt.pem"


[Authenticate CSF]


[Install Key]

# Key slot index used to authenticate the key to be installed

Verification index = 0

# Key to install

Target index = 2

File = "../../crts/IMG1_1_sha256_2048_65537_v3_usr_crt.pem"


[Authenticate Data]

Verification index = 2

Blocks = 0x10800000 0x0 0x69F020 "uImage-pad-ivt.bin"
$ ./cst --o uImage_CSF.bin --i uImage.CSF

CSF Processed successfully and signed data available in uImage_CSF.bin
Attach uImage_CSF.bin with padded ivt uImage
$ cat uImage-pad-ivt.bin uImage_CSF.bin > uImage-pad-ivt-csf.bin
Create Signed uImage
$ objcopy -I binary -O binary --pad-to=0x6A1020 --gap-fill=0x00 uImage-pad-ivt-csf.bin uImage-signed.bin
That’s it, you can now modify your U-Boot bootcmd so it includes the HAB command that checks the kernel,
Signed uImage CHECK??
icorem6qdl> fatload mmc 0:1 0x10800000 uImage-signed.bin

reading uImage-signed.bin

6950944 bytes read in 351 ms (18.9 MiB/s)

icorem6qdl> hab_auth_img 0x10800000 0x69F000


Authenticate image from DDR location 0x10800000...


Secure boot enabled


HAB Configuration: 0xcc, HAB State: 0x99

No HAB Events Found!